Tuesday, July 31, 2007

Peach Cobbler #1

I love peach cobbler. Last year I got delicious peaches while working in Roanoke, Virginia. This year, I'm in Massachusetts, but I've managed to find some decent peaches. I don't know exactly what recipe I used last year, but I'm starting with this one (note: the "Grandma's Peach Cobbler", not the "Old Fashioned Peach Cobbler"). This cobbler is a sweet, buttery cake stuffed with peaches. Simply melt 1 stick of butter in a pan. Then mix 1 cup each of milk, flour, and sugar plus salt and baking powder. The batter goes into the pan over the butter and then the peaches are loaded on top. The batter rises and cooks around the peaches and it's very delicious.

Recently I've had a few issues with this recipe. The batter was a little thin, and last year I don't think I used 1 cup for all three ingredients. So I decreased the milk to 3/4 cup. This yields a good batter consistency. Also, since I did this in an 8x8 pan instead of a 9x13, the middle was a bit uncooked. I prefer cobbler to be thick, and the prescribed amount of peaches and batter is just right for an 8x8 pan, but not enough for a 9x13. I think I'll need to decrease the temperature maybe to 325 degrees or so, and increase the time to maybe an hour (it took 45 minutes at 350).

Sadly, next time I think I will decrease the butter. I love how the cake becomes extremely buttery (almost like it's fried in butter), but I really should consider my cardiovascular health. I think I could probably decrease the butter to 3/4 stick, or even 1/2 stick.

Sunday, July 29, 2007

Pizza attempts 7 & 8

I made this pizza using the same recipe, except I am now keeping track of how much flour I use. I mixed in 214g of flour and let it autolyse. I let it sit for a little too long (45 mins) and when I came back it was all bubbly, much like a yeast starter. I mixed for 8 minutes with the dough hook of a hand mixer, added 72g of flour gradually, and kneaded about 10 minutes by hand (my hand mixer isn't powerful enough to handle all of the flour mixed in). I then balled the dough, slapped it in a bowl with some oil, and refrigerated. I noticed that this dough felt really good, and passed the windowpane test with flying colors, so maybe my kneading technique is getting better.

It was after I put the dough in the fridge that I realized I forgot the salt. You might know that dough without salt is about as useful for baking as a ball of mud. I pulled it out of the fridge about 6 hours later and tried to incorporate 2 tsp. of crushed up kosher salt. It wasn't easy, and I felt like I was tearing the dough too much because it was stiff from the fridge. Eventually it warmed up and became easier to handle. I decided to bake it that night after a 30 minute rise because I figured I screwed it up already. The pizza was actually about the same as my previous attempts.

Pizza, attempts 5 & 6

My fifth attempt at making pizza began a new era in pizza making at my house. My new co-workers bought me a pizza peel! It replaces the makeshift peel I created from a sheet of plywood. Besides the new hardware, there isn't much to say about these two pizzas. I followed the same recipe as before, intending to improve upon my technique. There wasn't much improvement, and I had a harder time with stretching the dough. I guess it's because this time I only let the dough sit for 90 minutes, so it wasn't as loose as attempt 4. I'm still having problems with the dough tearing a bit, so maybe I'm not developing it enough. The pizza still tasted good though.

One interesting development here is that I used a slightly wetter dough in hopes that it would be looser. Consequentially, the top of the crust was not nearly as cooked as the bottom. I got a charred bottom and a white top. This perplexed me for a while but I think it's because the dough is wetter. The wetter the dough, the hotter the oven needs to be. Hopefully this will be less of an issue when I get my dough thin enough.

In attempt 6, the dough dried out a bit in the fridge, even though it was stored in an oiled, sealed bag. Thus, this dough also had some tearing problems but still made a tasty pizza.

This time I took a few pictures of the dough making process, with some captions below:

The dough passes the windowpane test: gluten is developed!

The dough after kneading before going into the fridge

The dough after being removed from the fridge, divided, and rested

I flattened the dough with the heel of my hand

Then I stretched it by picking it up and stretching the edge to develop the cornice

I did some more stretching, but it doesn't want to get any bigger!

Sunday, July 15, 2007

Sticky buns attempt 1

Today I made sticky buns. I've made cinnamon buns before, and these are similar except they have and ooey gooey mess that's baked into the top. I used a recipe from elise.com/recipes. It was adapted from an Oprah recipe, which made me a little worried, but they looked good.

The process itself is pretty simple. I kneaded the dough by hand for 10 minutes since I don't have one of these, and let it rise. One point of interest is that I used instant yeast, not active dry yeast, so I didn't have to proof it. I just mixed all of the dough ingredients together.


Later on in the recipe I rolled out the dough and brushed on melted butter. The recipe calls for melting 4 tablespoons of butter and brushing it onto the rolled out dough. I applied liberally, but I don't think I used half of the melted butter. Also, something not mentioned in this recipe is it's a good idea to leave about a 2 inch margin at the top of the dough so that when you're rolling it up, that last piece of dough will stick and your rolls won't unravel as easily. I then applied the cinnamon-brown sugar mixture and went the extra mile and also sprinkled some chopped pecans on top.


Once I rolled the dough, I used my beautiful new Wusthof tomato knife which does an excellent job of cutting the rolls. A sharp serrated knife won't squash your roll, even if you have chunks of pecans inside like I had. Meanwhile I created the gooey syrup and poured it into the pan, sprinkled pecans on top, and then placed 15 rolls on top of that. You'll notice in the picture two little end pieces which I also crammed in there. I might need to work on my rolling so I don't get such irregular shaped end pieces which need to be cut off separately.

The next morning, they came out of the fridge and into the oven after a short resting period. I'm still getting used to the oven in my new apartment, and it is getting much hotter than it should, so my buns were a little too toasted--but nothing serious.

These buns had a really good texture: light and chewy. However, the taste wasn't ideal for me. First of all, there was too much orange zest in the dough. It wasn't quite overpowering, but it was too much for my taste. I would reduce by at least 1/3 or even eliminate the zest. Secondly, the sticky syrup had too much honey. It was made of butter, brown sugar, honey, and corn syrup. I think I would reduce the honey from 3 to 1 tablespoons or eliminate it altogether. It was too strong--I prefer honey as a minor accent rather than a major flavor. In fact, while eating these buns the primary flavors are orange and honey--not bad, but not my preference. I really like the taste of a butter-sugar or butter-brown sugar mixture but I just tasted honey. If I use the same recipe next time I'll adjust those two things but I think the rest of the recipe worked out great.

Thursday, July 12, 2007

Pretzels attempt 1

Pretzels... normally I would not aspire to create such things, as I have no sentimental attachment to these contorted ropes of salted bread. But my wife does, so I'm game. I'm following the Good Eats pretzel recipe. The dough is simple enough. I heard on Good Eats that hand-kneading takes twice as long as machine-kneading. So I kneaded this dough for 10 minutes by hand.

I set the dough to rise while I headed out to go shopping. However, a minor setback during which we temporarily lost $75 worth of coupons and gift cards for the store delayed us by 30 minutes. Since there was no way I'd return by the time the dough was done, I put it in the fridge to slow the rise.

I returned 1.5 hours later, and put the dough on the counter. I got it at least to room temperature (about 30 minutes), but couldn't wait any longer so I continued the recipe. The only problem was that since the dough wasn't finished rising, the dough started rising when I rolled it out into long ropes. The increased surface area of the rope combined with the heat of my hands probably helped this to happen. When I came back to a rope to try to roll it longer, I found it with a nearly hollow long air pocket in the middle. Thus I couldn't quite get the dough ropes long and thin enough, resulting in fat pretzels.

For salt, I used coarse sea salt that I crushed into smaller grains with my mortar and pestle. It worked fine. The pretzels had a nice moist and chewy texture out of the oven. The next day, I stored one in a plastic bag and ate it for lunch. By lunch time it was much tougher and the outside was slightly wrinkled. Maybe because of the plastic bag? Next time I will try to properly rise the pretzels. Below is a picture of the texture:


Pizza attempt 4

This is the last pizza from my first batch of dough. Since I went away for 2 weeks, I froze this dough ball. When I returned I put it in the fridge overnight. The next day it went on the counter for 2 hours. This dough was much harder to work with because part of the dough got dried out, possibly from the freezer. It was also much harder to stretch and ripped much more easily than the first three pizzas. I couldn't stretch it out much but I did what I could. I used the sauce described on Jeff's web site. It's composed entirely of crushed canned tomatoes and seasoning. I baked this one for 4 minutes.

It was still very good, much to my surprise. And the sauce was definitely a major improvement. Luckily, I made a lot of it so I'll have the same sauce for many pizzas to come. Also, 4 minutes is the perfect number for my oven.

Unfortunately, my stone cracked during baking! My lumpy dough stuck to the peel a bit when I put it in the oven, resulting in a small hole in the bottom of my pizza. That hole allowed sauce to directly contact the stone, cracking it in about 3 minutes! Fortunately, Bed Bath and Beyond let me exchange it for a new stone!


Pizza attempt 3

For my third pizza from this batch, I decided to let the dough rest on the counter for much longer. I think it probably sat out under a tea towel for 2 hours or so. It didn't really rise much because it started out cold. But I immediately noticed a difference in the dough. It stretched out much easier and was much more relaxed. I still had some dough problems but it was much easier this time. I cooked this pizza even less, for 4 1/2 minutes. It was even better than the ones before. It was so good I even shared some with my neighbors!


Pizza attempt 2

After my first pizza attempt, I knew that I was on the right track. So for the second attempt, I removed a dough ball from the fridge and let it rest on the counter for the requisite 30 minutes.
I followed the same procedure as last time, but this time I just wanted to reduce the oven time. I had some similar trouble with stretching out the dough, but that was not surprising given that it was from the same batch. This time it was in the oven at 550 degrees for 5 minutes. This pizza was very similar to the first, but the crust was more tender because it wasn't cooked as long. However, I think it could still be cooked less. I topped this pie with slices of chicken from a breast I pan-fried, seasoned with oregano and thyme. More pictures of the pie:


Pizza attempt 1

I'll admit, I'm a bit of a pizza snob. I guess my picky nature traces back to my origins in New York. I was born in Yonkers and lived there only 5 years, but visited often. And when I visited, I always ate some of the world's best pizza. Anyone who has a constant reminder of how pizza should taste will never be satisfied with pizza from a chain restaurant.

When I started my first pizza attempts, I tried to emulate this guy. It was a little too ambitious, considering that I didn't have a pizza stone, peel, or 800 degree oven. And my homegrown yeast culture, while healthy looking, failed to properly rise my attempts at French bread, bagels, and of course, pizza. It was pretty discouraging.

A few weeks ago, I watched the Good Eats episode on pizza. It followed several of the principles I previously attempted, but was much simpler and used a normal oven temperature. At this point I also had a stone and a peel. I decided to give it a try.

My peel is made from a spare piece of 5/8" plywood I had lying around. I simply cut it in the general shape of a peel with a circular saw, and I had a working (albeit crude) pizza peel.

Then I followed the instructions from the Good Eats episode "Flat is Beautiful." I doubled the recipe to make four pizzas. First, I mixed the ingredients just until combined, then I let it autolyse for 20 minutes (not included in the episode). The autolyse helps to develop the gluten, important for a chewy crust. I don't have a stand mixer, so I kneaded by hand for a long 30 minutes. It barely passed the windowpane test (stretch out a small ball of dough thin enough to let light pass through without tearing), so I let it cold rise in the fridge.

The next day I removed it from the fridge and divided it by four. Three I returned to the fridge, and the last I let rest 30 minutes as per the instructions in the episode. When I formed the pizza shape, it was very tight. It was hard to pull the dough thin enough, and the dough in the middle of the pizza was uneven. So some places were thin, and others thick from the way that I had folded the edges in the bottom of the dough to make a ball. I was a little concerned but I put it on the peel, added the toppings, and onto a stone in a preheated 550 degree oven for 6 minutes.

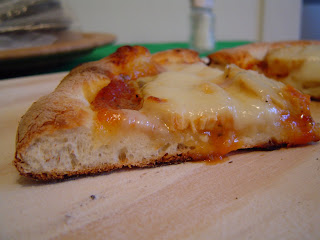
The results were actually tasty! It was a little overcooked, because I discovered my oven is hotter than I thought. Thus, the crust was a little tough but it had good flavor. I could tell I was on the right track. And the crust rose, so I had a nice cornice. Below are more pictures:


My Quest

I've enjoyed cooking since I was a kid, and recently since college, food has been more of a serious hobby for me. I get excited about trying new techniques and recipes, and few types of food excite me more than fresh baked goods. I love quality fresh bread, pizza, pastries, cakes, cookies, etc. For years I just lived with the fact that I couldn't have really good baked goods unless I was visiting a place like New York. I just figured there was something in the water, or some magic in their ovens, or some secret Italian secret that was causing their pizzas and breads to be so delicious, while my family's pizza crust remained mediocre at best.

Recently I started doing some reading on pizza and bread in particular, and the consensus seemed to be that the best baked goods can and should come out of the home. As I continued reading, I started to believe that maybe I myself could create the food I loved the most. This blog will narrate my quest for delicious baked goods of all types: pizza, bread, bagels, donuts, pastries, cakes, etc. There's no limit to my madness! But I think I'll start with my favorite: pizza.