Thursday, April 24, 2014

Chocolate Chip Cookies

There are a zillion chocolate chip cookie recipes out there, but I'm frequently asked about the ones we make at Highrock Church.  They're based on the New York Times recipe, but I've made enough modifications that it's worth documenting here.

With cookies, the same recipe can turn out differently with only minor variations: the size of the eggs, the type of oven, and the softness of the butter can all make a noticeable impact.  You probably won't perfectly replicate the Highrock variety, but it'll be delicious nonetheless.

Butter mixture:
  • 10 oz (2 1/2 sticks) unsalted butter, softened
  • 10 oz (1 1/4 c.) brown sugar (I prefer raw "muscovado" sugar)
  • 8 oz (1 c. + 2 Tbsp) white sugar
  • 1 1/2 tsp. kosher salt (or 1 tsp. of a fine-grain salt)
Egg mixture:
  • 2 large eggs
  • 2 tsp. vanilla extract
Flour mixture:
  • 17 oz. all-purpose flour (3.75 cups fluffed--not settled)
  • 1 1/2 tsp. baking powder
  • 1 tsp. baking soda
Chocolate:
Preheat oven to 350 degrees.

Blend together the butter mixture until fully combined, about 5 minutes.  

In a small cup, whisk the eggs and vanilla.  With the mixer running, slowly pour the eggs into the butter mixture.

In another bowl, sift together the flour mixture, and gradually add it to the rest of the batter until fully combined.

Finally, add the chocolate chips.

Scoop dough at your desired size (I use a 1 oz. disher) and bake on a parchment-lined cookie sheet until the cookie has just barely turned uniformly golden.  Time depends on dough temperature, oven temperature, and cookie size, but they usually take 10-12 minutes.  

Refrigerate or freeze unused dough.  The cookies may improve if you hold the dough overnight before baking, because the flour has time to absorb moisture.

Notes:
  • I mix the salt in with the butter mixture because it ensures the salt is evenly mixed throughout the batter, especially when using kosher salt with larger flakes.
  • I reduced the baking soda by 1/4 tsp. compared with the NYT recipe because I thought it tasted slightly too alkaline.
  • The NYT recipe calls for enormous cookies with Valrhona fèves, which are about $20/lb.  This produces an awesome cookie and if you have the budget to try it once, I recommend it!  Otherwise, the dark Ghiradelli chips are also great.
  • On the topic of luxurious enhancements, try substituting a premium cultured butter and see if you notice a difference.  Premium butters taste better and can have a higher fat content.


Tuesday, October 29, 2013

Brownies


Brownies are one of my go-to desserts to make because they're so easy, delicious, and freeze well.  I've tried many recipes and this one is by far the best: it's creamy without being undercooked, dense, and chocolatey without being overpowering.

Quality chocolate is important.  My favorite baking chocolate is Scharffen Berger, but Callebaut is cheaper and also works well.

Recipe adapted from Scharffen Berger

Chop and melt in a double-boiler on very low heat (use a metal bowl placed over steaming water): 
  • 4 oz. unsalted butter
  • 6 oz. semi or bittersweet chocolate 
Stir occasionally to prevent the chocolate from burning.

In another bowl, whisk together:
  • 1/2 c. white sugar
  • 1/2 c. brown sugar
  • 1/4 tsp. salt
  • 2 large eggs
  • 1/2 tsp. vanilla (optional)
  • 1 Tbsp. bourbon or rum (optional)
Now, combine the following:
  • Melted butter/chocolate mixture
  • Egg/sugar mixture
  • 1/2 c. AP flour
Pour into an 8"x8" aluminum baking pan lined with foil or parchment.  Sprinkle pecans on top if desired.

Bake at 400 for 20 minutes, but check after 16 minutes to make sure you don't overcook it.  Brownies should be set on top but moist inside.

Remove from the oven and chill in an ice bath until the pan is no longer hot.  This stops the cooking and ensures an even texture.

Freeze any leftovers.


Tuesday, August 19, 2008

Croissants

Unfortunately I'm writing way after the fact. Pretty much all there is to say is that I made croissants and they were darn tasty. You'll notice the shape is a little funny... I didn't cut them correctly so when they rolled up they weren't quite right. You're supposed to cut them like this:

\/\/\/\/\/\/\/\/\/\/\/\

...not into right triangles as I did. The basic procedure was to laminate the dough by filling with butter and folding, rolling, folding, etc. By the final fold the layers were so thin they wanted to rip, but it came out fine.

I'm not sure what recipe I used, but it might be this one:
http://www.thefreshloaf.com/recipes/croissants
The one thing I know for sure is that I used my sourdough starter. To use starter instead of commercial yeast I generally put in about a 1/4 c. of the starter and try to roughly add flour or water to make the consistency of the final dough right. It seemed to work well enough.


Saturday, March 15, 2008

Yeast Starter

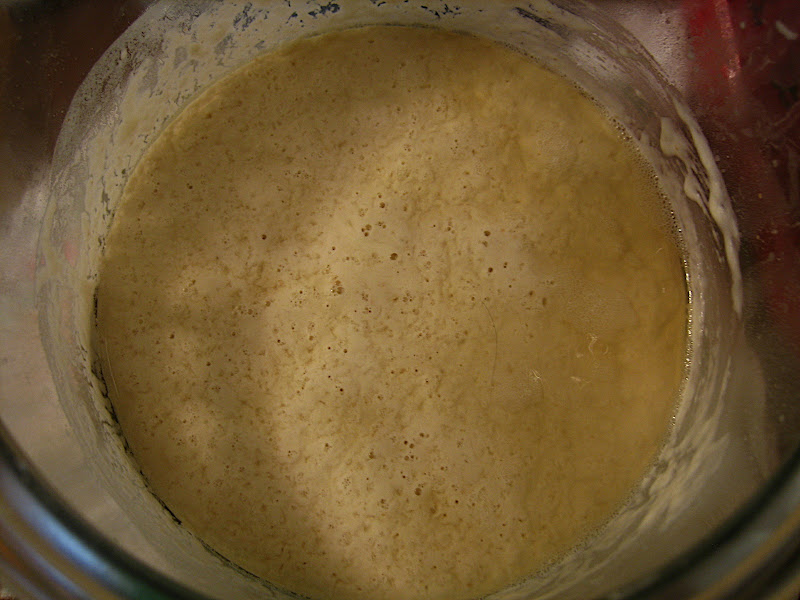
I'm trying to capture some wild yeast so that I can leaven and ferment dough. It's not so easy though. I followed instructions in my book, "Crust and Crumb", and everything's all bubbly but it doesn't look so healthy. Here's what it looks like now:


I've published pictures from each of the first 5 days of creating my starter on my picasa album:
http://picasaweb.google.com/rysilva/YeastStarter

Tuesday, September 25, 2007

Pizza attempt 19

I've just been doing more of the same as far as pizza goes, since my pies have been coming out good. I'm now trying to just learn more since I know I have a pretty good recipe. With this pie, the point worth mentioning is that the middle was a little soggy. Sometimes I thought that meant it was undercooked, but I realize now that it's because the sauce is too wet. When I make the sauce, I strain out clear liquid which makes it drier. You can see in the final picture how the middle is a bit soggy.

Another point is that not all cheese is created equal. Sometimes when I slice the mozzarella, it melts in place and you can see discrete circles of cheese on the pie. Other times, it all melts into one contiguous blob of cheese. I'm not sure what this means though.

From now on I will only post about pizza if there's something worth noting. I just make too much pizza to write about!

Dough out of the fridge and rested for 2 hours

Stretched out on my peel

Loaded up

Soggy middle

Underside

Monday, September 10, 2007

French Baguettes attempt 1

I get pretty excited--maybe a little too excited--about good bread. After I discovered it's possible to make good pizza, I thought why not bread? I made this recipe out of the same book I made the last pizza: "Crust and Crumb" by Peter Reinhart. It has two formulas for French Bread: one "easy" way, and a second way using Pâte Fermentée (old dough). I'll include the recipe for the first easy way. This is the method I used for my first loaf. It was very good! The crust was crispy and chewy with a moist crumb.

3 1/2 c. (453 g) unbleached all-purpose flour
3 1/2 c. (453 g) unbleached bread flour
2 1/2 tsp. (19 g) salt
1 tsp malt powder or brown sugar
1 1/2 tsp. instant yeast
2 2/3 cups cool water (65 to 70 degrees)
Vegetable oil cooking spray
  1. Combine the flours, salt, malt, and yeast in a bowl.
  2. Add the water, and stir with a large spoon until the flour is gathered and the dough forms a ball.
  3. Turn the dough out onto a lightly floured work surface and knead vigorously for about 10 minutes, until the dough is soft and pliable, tacky but not sticky. Knead in extra flour or water (just a few drops at a time) if necessary to achieve this consistency. The dough is fully kneaded when it passes the windowpane test.
  4. Place the dough in a large clean bowl that will hold it when it has doubled in bulk. Mist the dough lightly with cooking spray. Cover the bowl (not the dough) with plastic wrap or enclose it in a plastic bag, and let rise for about 30 minutes. It should just begin swelling.
  5. Knead the dough for 30 seconds, form it into a ball, and re-cover the bowl with plastic. Allow it to rise for 90 minutes, or until doubled in size.


  6. Scale, bench, and shape the dough into loaves or rolls as described below. Place them in pans or baskets. If using pans, line them with parchment paper and dust them with cornmeal or semolina for texture; if using baskets, mist them with cooking spray and dust them with rice flour or bread flour to prevent sticking.

    Scale the dough using a kitchen scale. You can save 1/3 of the dough for a later batch (discussed in a later blog entry). Here's the short version of how to shape into baguettes: shape the dough into balls and rest for 20 minutes. Then shape into a football and rest for 3 minutes. Flatten into a rectangle. Fold the bottom up 1/3 of the way, and fold the top down over top of it (see picture). Seal the seam, stretching the dough around the rest of the baguette. Then roll the baguette outwards. Rest and flatten into a rectangle again, and repeat the fold.
  7. Lightly mist the top of the shaped dough with cooking spray to prevent sticking, and place the pans or baskets inside a large plastic bag. Let rest for 15 minutes.
  8. Place the shaped dough in the fridge overnight, making sure the bag is loose but closed to prevent drying. [I didn't have a bag big enough so I covered loosely with plastic wrap.]
  9. The next day, remove from the refrigerator but leave it in the bag. The dough should be 50-75% larger than when it went in. If so, let it sit out 1 hour to take off the chill. If not fully risen, let it sit out 2-3 hour until it completes its rise.
  10. Prepare the oven for hearth baking by placing a steam pan on a lower rack. Preheat to 475 degrees F (allow about 30 minutes to heat fully). Fill a spray bottle with water.
  11. Remove the dough from the plastic 15 minutes before baking to allow the surface to dry slightly. Just before baking score the bread about 1/4" to 1/2" deep. Put the loaves in the oven. If they were on parchment paper, leave them on the paper. Then pour 1 cup of hot tap water into the empty steam pan and spray water on the oven walls and the bread with water.
  12. After 2 minutes spray the oven walls and the bread again. Repeat in 1 minute. Then lower the oven temperature to 450 degrees F.
  13. Wait 10 minutes and rotate the bread if necessary.
  14. When the bread has developed a rich, golden brown color--this will take about 25 minutes total for loaves and 15 minutes total for rolls--turn off the oven or lower to 350 if you plan to bake again. Leave the bread in the oven an extra 5-10 minutes, until it seems on the verge of overbrowning.
  15. Remove the bread to a cooling rack and allow it to cool thoroughly before eating, 60 minutes for loaves, 20 minutes for rolls.

Thursday, September 6, 2007

Pizza attempts 17 & 18

For this pizza I used the same recipe as last time. I really liked the way the crust had a nice flavor and texture just from the addition of a poolish. This time there isn't much to report on except I fried some bratwurst and used that as a topping. Highly recommended. Pizza 18 was a little undercooked and had a slightly soggy middle as you can see in the cross-section shots. I might have tried to make it too thin, and it could have stayed in the oven longer anyway. It also is more difficult to slide the pizza off the peel and into the oven, especially with the crust so thin and wet. Pressing down on the toppings with your hands is a must or else the sausage will fly all over the place when you try to "shuffle" the pizza off the peel. However, pressing down makes the dough more likely to stick. It's important to shake the pizza peel during the pizza making process to make sure the pizza is still loose.


Pizza 17: Nice crust throughout

Pizza 18: bird's eye view

Soggy crust in the middle of pizza 18

Thursday, August 23, 2007

Pizza attempts 13 - 16

These were my best pizzas yet. I used a different recipe, from a book called Crust and Crumb by Peter Reinhart. It's pretty similar, except it uses a poolish (a preferment similar to a yeast starter). The dough was also wetter. Since the recipe isn't online, I'll give it to you here:
  • 300g (2 1/3c) unbleached bread flour
  • 10g (1 1/3tsp.) salt
  • 1/6 tsp. instant yeast
  • 4 tsp. sugar
  • 2 Tbsp. olive oil
  • 123g (about 1/2 cup) cool water (65-70 degrees)
  • 189g (3/4c + 1Tbsp. + 1tsp.) poolish-style sponge
A few notes about this recipe:
  • I've multiplied the recipe by 2/3, since that makes about two 12" pizzas.
  • I've converted to grams, but also show the volume measures. This shows how easy it is to use grams and change the quantity of any recipe (I know I don't want to measure 0.83 cups of something). Weight is much more reliable than volume!
  • I reduced the olive oil. The recipe calls for 1/3c. of olive oil (scaled down) and that seemed like a lot to me, and olive oil is expensive. I didn't see any reason to use that much. If you do, let me know.
For the poolish, mix 510g (4c) flour, 4c water, and 1/4 tsp. instant yeast. Beat until smooth, then cover and rise for 5 hours. Refrigerate overnight and use, or keep in the fridge for up to 5 days. This is a preferment; it is often used in bread and will contribute great flavor to our dough.

To make the pizza dough, mix all ingredients--using only 200g (2/3) of the flour--until just combined. Cover and rest for 15-20 minutes. This is the autolyse (no, I don't know how to say it either) and it will help develop the gluten. Then, I use the same technique as before. I use my hand mixer with the weird spiral dough attachment to mix for 8 minutes, then I gradually add in the rest of the flour in about 5 minutes. Once the flour is all added, it's too dry for my hand mixer so I knead by hand until it passes the windowpane test. It's very difficult to knead this dough by hand, but try to use as little extra flour as possible.

To do the windowpane test, pull off a small piece of dough and toss in flour. Gently flatten and stretch, like you're making a tiny pizza. The dough should stretch to paper thin without tearing so you can almost see through it. If the dough tears first, keep kneading.


After kneading, make a ball by stretching one side and tucking the sides under itself, kind of like tucking a jellyfish's legs into the bottom. Spray oil in a bowl and place the dough in. Spray oil lightly on top of the dough and cover with plastic. Let this rise for about 2 hours. You're looking for it to rise to about 1 1/2 times it's previous volume. The book says to rise until bubbly for about 3 hours, but I think this is too much. Refrigerate for a day or two.

On pizza day, remove the dough from the fridge. Divide in two and make two balls. I put one back in a bowl to rise and the other goes in the fridge in a plastic bag sprayed with oil. I let the rising dough get to room temperature. Depending on how much the dough rose before refrigerating, the dough may have to rise more again. In any case, I'd get it to at least room temperature. Turn on your oven at least 30 minutes before you think the dough will be ready, enough time to preheat your stone and get the oven as hot as possible. Then it's time to make the crust. Toss the dough in flour and flatten with the heel of your hand. Slowly stretch it out and either toss in the air, or stretch in the air, or stretch with your knuckles, or stretch on the pizza peel. You may have to rest the dough for a few minutes if it wants to shrink back again. Place on the peel and load with toppings. Give the peel a shake before you put it in the oven to make sure the dough isn't sticking. It also may help to press the toppings down on the pizza so they don't fall off when you're shoveling the pizza in the oven. Put the pizza on the stone and bake.

My pizza bakes for 4 minutes. You may want to rotate it halfway through cooking. Here are more pictures:

The dough before decorating. You can see that it was still bubbly in the middle--this made it hard to make the dough thin.

It was hard to get a picture before it was eaten!

Wednesday, August 22, 2007

Angel Food Cake

When my parents came for the weekend, I made them some angel food cake for dessert. It turned out well and wasn't too difficult. I don't see any way to really improve on this recipe, so I'll include the recipe here with my comments and I won't post on Angel Food Cake anymore unless I improve upon this.

This recipe came from Good Eats, my default source for recipes. I recommend watching the episode "Let them eat foam" to get all of Alton's tips.
  • 1 3/4 cups sugar
  • 1/4 teaspoon salt
  • 1 cup cake flour, sifted
  • 12 egg whites (the closer to room temperature the better)
  • 1/3 cup warm water
  • 1 teaspoon orange extract, or extract of your choice (I used vanilla)
  • 1 1/2 teaspoons cream of tartar
Preheat oven to 350 degrees F.

In a food processor spin sugar about 2 minutes until it is superfine. Sift half of the sugar with the salt the cake flour, setting the remaining sugar aside.

In a large bowl, use a balloon whisk to thoroughly combine egg whites, water, orange extract, and cream of tartar. After 2 minutes, switch to a hand mixer. Slowly sift the reserved sugar, beating continuously at medium speed. Once you have achieved medium peaks, sift enough of the flour mixture in to dust the top of the foam. Using a spatula fold in gently. Continue until all of the flour mixture is incorporated.

Carefully spoon mixture into an ungreased tube pan. A tube pan is important because the angel food cake is really just foam. It can't hold itself up, so it needs the tube in the middle as a "crutch." As it bakes, the bubbles expand and cook, and the batter climbs up the tube and the sides of the pan. If you grease the pan, then it will be more difficult for the foam to climb up. Bake for 35 minutes before checking for doneness with a wooden skewer. (When inserted halfway between the inner and outer wall, the skewer should come out dry).

Cool upside down on cooling rack for at least an hour before removing from pan. Hopefully the tube pan's inner "tube" is slightly taller than the rest of the pan, so when you turn it upside down it can rest on the tube with the rest of the cake slightly elevated off the counter. This step is important because fresh out of the oven, the cake still can't hold itself up while it cools. If you don't turn the pan upside down, your cake might fall.

That's it! Top with fruit and fresh whipped cream.

Sunday, August 19, 2007

Dinner Rolls

I made these rolls using a recipe at baking911.com, which actually comes from Beth Hensperger's The Bread Bible: Beth Hensperger's 300 Favorite Recipes. They were very good, although not as light and fluffy as Ukrop's white house dinner rolls. I'll keep the recipe in mind, but I'll probably try something else next time just for fun.

There isn't too much to say about the recipe. As usual, I didn't actually use buttermilk, but I added 1 tablespoon of white vinegar to a cup of milk and let it sit for 10 minutes. The dough was very wet, but I managed. Below are pictures:

Wet dough!


Ready to rise


Bench proofing just prior to baking.

Friday, August 10, 2007

Pizza attempts 11 & 12

This time I tried a little more flour. I used 3/4 c water with 300 total grams of flour. I'm mainly trying to use grams now because (a) it's an international standard, and (b) it has much finer granularity. There's never a need to use fractions when dealing with grams, because there are about 28 grams in 1 ounce. I used 200g flour in the initial mixing, and let it autolyse for 20 minutes that way. Then I gradually kneaded in the rest of the flour. The dough was a bit drier than before since I used more flour.

The most notable point in this batch is that before cooking, I've been putting the dough on the counter covered with a cloth and letting it warm and rise for 3 hours or so. But the dough has been drying out slightly. For pizza #12, I put it in a bowl, sprayed with cooking oil, and covered with plastic wrap. No drying out! This is how I will rise my dough in the future.

The first pizza didn't stretch out nearly as nicely as the last two pizzas, probably because the dough was drier. However, the second pizza stretched out but not very evenly. I had a thin area and a thick area, and I couldn't stretch out the rest of the thick portion of the crust. It was ok though, and the pizzas were yummy. I'm still not getting much browning on the tops of my crusts, which I originally thought was because my dough was wetter. I'm thinking now that it might be because I'm not heating my oven enough. After 30 minutes, it's not quite up to 500 degrees, and my oven is supposed to go to 550. Next time I'll preheat longer.

Pizza 11, with a slightly dried exterior
Pizza 11, stretched to the limit
Pizza 12, still moist from resting in a bowl covered in plastic wrap
Pizza 12, streched to the limit

Saturday, August 4, 2007

Pizza attempts 9 & 10

A major milestone: my dough stretched super thin! I started out with 200g of bread flour and the usual recipe for the rest of the ingredients. I did the autolyse, 20 minutes this time, and then mixed with the hook on my hand mixer for 8 minutes. Then I gradually started adding 90g more flour until I couldn't use the mixer anymore, at which point I added the rest of the flour and started hand kneading for about 10 more minutes. Windowpane test, check! Into the fridge we go.

My wife pulled the dough out at 4pm and covered with a tea towel. At about 5:45 she checked on it and the dough was drying out. She turned them over hoping to keep them from drying out too much, and they just flattened out under the towel. So I arrived home at 6 to two collapsed, half dried out dough balls. Luckily, only the outsides were really dried out. Since this dough was pretty wet on the inside, I patted flour on both sides and started forming the crust. It stretched out beautifully without ripping, and I had a nice large pizza crust.

This pizza still needs some work, but I'm really happy about getting the dough to stretch out. As you can see in the picture, the crust didn't really rise much for the cornice. It wasn't dense really, it was just a little funky. This is probably in part because of the dried out parts of the dough. In any case though, I'm on the right track. I will try a little more flour in the next recipe and see if I can still get the dough to stretch out like this.

The dough stretched out nicely without tearing, but you can see how it's a little funky from drying out

The first pizza out of the oven


Tuesday, July 31, 2007

Peach Cobbler #1

I love peach cobbler. Last year I got delicious peaches while working in Roanoke, Virginia. This year, I'm in Massachusetts, but I've managed to find some decent peaches. I don't know exactly what recipe I used last year, but I'm starting with this one (note: the "Grandma's Peach Cobbler", not the "Old Fashioned Peach Cobbler"). This cobbler is a sweet, buttery cake stuffed with peaches. Simply melt 1 stick of butter in a pan. Then mix 1 cup each of milk, flour, and sugar plus salt and baking powder. The batter goes into the pan over the butter and then the peaches are loaded on top. The batter rises and cooks around the peaches and it's very delicious.

Recently I've had a few issues with this recipe. The batter was a little thin, and last year I don't think I used 1 cup for all three ingredients. So I decreased the milk to 3/4 cup. This yields a good batter consistency. Also, since I did this in an 8x8 pan instead of a 9x13, the middle was a bit uncooked. I prefer cobbler to be thick, and the prescribed amount of peaches and batter is just right for an 8x8 pan, but not enough for a 9x13. I think I'll need to decrease the temperature maybe to 325 degrees or so, and increase the time to maybe an hour (it took 45 minutes at 350).

Sadly, next time I think I will decrease the butter. I love how the cake becomes extremely buttery (almost like it's fried in butter), but I really should consider my cardiovascular health. I think I could probably decrease the butter to 3/4 stick, or even 1/2 stick.

Sunday, July 29, 2007

Pizza attempts 7 & 8

I made this pizza using the same recipe, except I am now keeping track of how much flour I use. I mixed in 214g of flour and let it autolyse. I let it sit for a little too long (45 mins) and when I came back it was all bubbly, much like a yeast starter. I mixed for 8 minutes with the dough hook of a hand mixer, added 72g of flour gradually, and kneaded about 10 minutes by hand (my hand mixer isn't powerful enough to handle all of the flour mixed in). I then balled the dough, slapped it in a bowl with some oil, and refrigerated. I noticed that this dough felt really good, and passed the windowpane test with flying colors, so maybe my kneading technique is getting better.

It was after I put the dough in the fridge that I realized I forgot the salt. You might know that dough without salt is about as useful for baking as a ball of mud. I pulled it out of the fridge about 6 hours later and tried to incorporate 2 tsp. of crushed up kosher salt. It wasn't easy, and I felt like I was tearing the dough too much because it was stiff from the fridge. Eventually it warmed up and became easier to handle. I decided to bake it that night after a 30 minute rise because I figured I screwed it up already. The pizza was actually about the same as my previous attempts.

Pizza, attempts 5 & 6

My fifth attempt at making pizza began a new era in pizza making at my house. My new co-workers bought me a pizza peel! It replaces the makeshift peel I created from a sheet of plywood. Besides the new hardware, there isn't much to say about these two pizzas. I followed the same recipe as before, intending to improve upon my technique. There wasn't much improvement, and I had a harder time with stretching the dough. I guess it's because this time I only let the dough sit for 90 minutes, so it wasn't as loose as attempt 4. I'm still having problems with the dough tearing a bit, so maybe I'm not developing it enough. The pizza still tasted good though.

One interesting development here is that I used a slightly wetter dough in hopes that it would be looser. Consequentially, the top of the crust was not nearly as cooked as the bottom. I got a charred bottom and a white top. This perplexed me for a while but I think it's because the dough is wetter. The wetter the dough, the hotter the oven needs to be. Hopefully this will be less of an issue when I get my dough thin enough.

In attempt 6, the dough dried out a bit in the fridge, even though it was stored in an oiled, sealed bag. Thus, this dough also had some tearing problems but still made a tasty pizza.

This time I took a few pictures of the dough making process, with some captions below:

The dough passes the windowpane test: gluten is developed!

The dough after kneading before going into the fridge

The dough after being removed from the fridge, divided, and rested

I flattened the dough with the heel of my hand

Then I stretched it by picking it up and stretching the edge to develop the cornice

I did some more stretching, but it doesn't want to get any bigger!